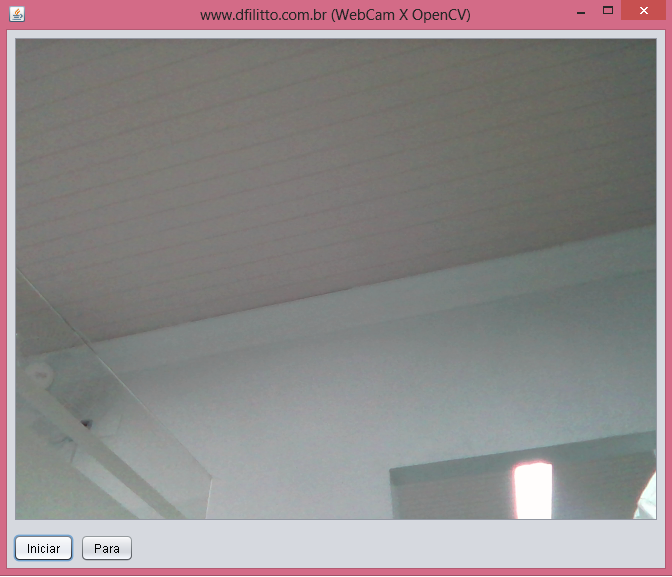
O post Como capturar imagens da WebCam utilizando Java e OpenCV tem como objetivo demonstrar como implementar em Java um software para capturar as imagens de uma webcam utilizando a biblioteca OpenCV.
Como capturar imagens da WebCam utilizando Java e OpenCV
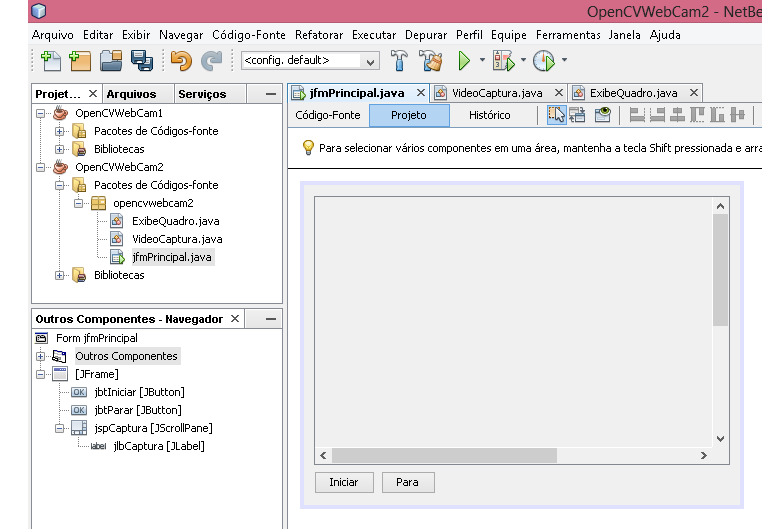
No desenvolvimento do software foi utilizado um formulário contendo um botão Iniciar (jbtIniciar) que cria os objetos webCam, exibeQuadro, executor e inicia o processo de captura e exibição das imagens; um botão Parar (jbtParar) para a execução da Thread e para a captura e exibição das imagens; um painel com rolagem (jspCaptura) utilizado para armazenar o label jlbCaptura; um Label (jlbCaptura) para exibir as imagens capturadas da WebCam;
Dentre as propriedades importantes do form estão a webCam que instância a classe VideoCaptura que tem como objetivo capturar as imagens da WebCam e converter as imagens que estão no formato Mat para BufferImage; exibeQuadro que instancia a classe ExibeQuadro que tem como objetivo capturar os quadros da WebCam e carregar o mesmo no label jlbCaptura; e Thread executor que cria uma Thread e executa o método rum de exibeQuadro;
Código Fonte
Download do Fonte
Partes Importantes do código fonte do formulário:
public class jfmPrincipal extends javax.swing.JFrame {
//Propriedades
VideoCaptura webCam;
ExibeQuadro exibeQuadro;
Thread executor;
…. {Código gerado pelo NetBeans}
private void jbtIniciarActionPerformed(java.awt.event.ActionEvent evt) {
// Evento clique do botão iniciar:
webCam = new VideoCaptura();
exibeQuadro = new ExibeQuadro(webCam,jlbCaptura);
executor = new Thread(exibeQuadro);
executor.start();
}
private void jbtPararActionPerformed(java.awt.event.ActionEvent evt) {
// Evento do botão parar :
executor.suspend();
}
Classe VideoCaptura:
/*
* To change this license header, choose License Headers in Project Properties.
* To change this template file, choose Tools | Templates
* and open the template in the editor.
*/package opencvwebcam2;
import java.awt.image.BufferedImage;
import org.opencv.core.Core;
import org.opencv.core.Mat;
import org.opencv.highgui.VideoCapture;/**
*
* @author Danilo Filitto
*/
public class VideoCaptura {VideoCapture video;
Mat imageMat = new Mat();
BufferedImage imageBuffer;
byte[] dat;public VideoCaptura(){
this.video = new VideoCapture();
this.video.open(0);
}public BufferedImage capturaQuadroBufferedImage(){
this.video.read(this.imageMat); //Captura o quadro
imageBuffer = this.matToBufferedImage(this.imageMat); //Converte para imageBuffer
return imageBuffer;
}public Mat capturaQuadroMat(){
this.video.read(this.imageMat); //Captura o quadro
return imageMat;
}
public BufferedImage matToBufferedImage(Mat matrix) {
int cols = matrix.cols();
int rows = matrix.rows();
int elemSize = (int)matrix.elemSize();
byte[] data = new byte[cols * rows * elemSize];
int type;
matrix.get(0, 0, data);
switch (matrix.channels()) {
case 1:
type = BufferedImage.TYPE_BYTE_GRAY;
break;
case 3:
type = BufferedImage.TYPE_3BYTE_BGR;
// bgr to rgb
byte b;
for(int i=0; i<data.length; i=i+3) {
b = data[i];
data[i] = data[i+2];
data[i+2] = b;
}
break;
default:
return null;
}
BufferedImage image = new BufferedImage(cols, rows, type);
image.getRaster().setDataElements(0, 0, cols, rows, data);
return image;
}static{
System.loadLibrary(Core.NATIVE_LIBRARY_NAME);
}
}


